Logging and Posting Time Sheet Entries
For businesses that bill clients based on the time spent on projects or services, accurate time tracking is essential. Zoho Books simplifies time-based invoicing by allowing you to log and post time sheet entries. This section will guide you through the process of logging time sheet entries, posting them to invoices, and managing related settings in Zoho Books.
Enable Timesheet
Before you can start creating projects, you will need to enable the Timesheet module. Here’s how you can do it:Go to Settings on the top right corner of the page.Select General under Preferences.Check the Timesheet option under Select the modules you would like to enable.Click Save at the bottom of the page.
New Time Entry
You can log time for each task in two ways:ManuallyStart timer
Manually
You can log time manually in two ways:Log Time for Individual taskWeekly time log
Log Time for Individual Task
You can log time spent on performing an individual task associated with a project manually. To do this:Go to Time Tracking > Timesheet.Click Log Time in the top right and from the dropdown, select Log Time again.Enter the Date.Select the Project Name from the dropdown.Choose the Task Name or create a new task from the dropdown.Enter the Time Spent and the other necessary details.Click Save.
Weekly Time Log
This feature is highly useful if you run multiple projects and have manually recorded time for various tasks done over a week. To log time:Go to the Timesheet module.Click Log time > Weekly Log.Enter the manually recorded time for various tasks done for multiple projects for the days in the week.Select the Project, Tasks and start entering the time spent.Add more projects/tasks by clicking + Add another line.Mark the Billable checkbox to add this entry to the invoice and bill the customer.Click Save.
You can also remove a line which does not have any time entry by clicking the Remove icon next to the row.
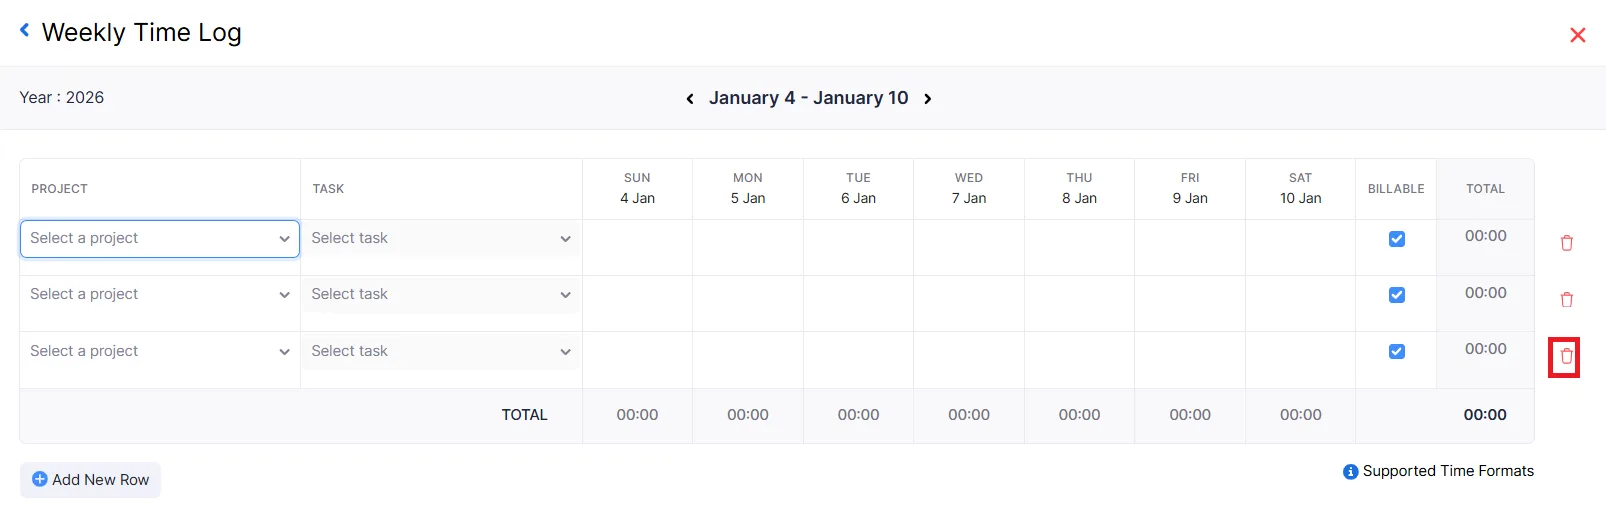
You can view the weekly log in the calendar view by clicking the calendar icon.
Start Timer
You can log time instantly using a timer and associate a project with it. Here’s how:Go to Time Tracking > Timesheet.Click Start in the top right of the page.
Enter Notes for the entry.Click the Associate Project option to link it with a project.Click Start Timer.
The timer will run on the left sidebar and you can choose to Stop, Pause or Discard the entry.
Once you stop the timer, you can enter the project details if you had not chosen earlier in the following popup.
Import Timesheet
If you already have a timesheet, you can import them into Zoho Books in the CSV, TSV or** XLS** format.Go to Time Tracking > Timesheet.Click the Gear icon in the top right corner of the page.Select Import Timesheet.
Click the Choose File button next to Upload File. You can download the sample CSV/XLS file for your reference by clicking sample file.Note: The file size cannot be more than 1 MB.Click Next.Ensure that all the fields are mapped correctly in the Map Fields page.Mark the box Save these selections for use during future imports if you want to use a similar import format next time.Click Next.In the Preview page, click Import.Note: Zoho Books will auto-match the file headers of the imported file to the closest matching field in Zoho Books. You can manually edit each field to match the headers, and save these preferences. On proceeding, Zoho Books shows you any unmapped fields you may have left out or could not match. You can map these by adding new fields with matching headers.
Transactions in Timesheet
You can create new transactions with the time entries from the projects module. Here’s how:Go to Timesheets > Timesheet.Select the time entry for which you wish to create a new transaction.You will be redirected to the project details page from where you can create the transactions for the project You can create transactions such as Quotes, Invoices, Bills, Expenses, etc., from this section.
Manage Timesheet
The timesheet that you record for your customers can be filtered and sorted in many ways.
Filter Timesheet
You can filter time entries based on their Status, Period, Customer, Project and User.
Let’s see how to filter the timesheet based on statuses:Go to Time Tracking > Timesheet.Click the Status dropdown in the top of the page.Select the status based on which you want to filter the timesheet.
Similarly you can filter the other columns as well.
Sort Timesheet
You can sort the timesheet based on their different columns or fields. Here’s how:Go to Time Tracking > Timesheet.Click the column which you want to sort. The sorting can be done based on ascending or descending order (indicated by the arrow). Click the field again to change the sorting order.
Calendar View
You can view the timesheet in a list view as well as in the Calendar View. The calendar view shows the tasks performed and the hours spent on that particular task in a calendar format. You can also add a new entry for a particular day.To view your timesheet in the Calendar View:Go to Time Tracking > Timesheet.Click the Calendar View option in the top right corner of the page.
To add a new entry:
Hover over the date on which you wish to add a new entry.Click the + New Entry option.
Enter the Project Name, Task Name, Time Spent and the User.Click Save.
To edit the entry:
Click the entry.Edit the required details.Click Save.Note: You can view the total number of hours spend on that particular month at the bottom of the page.
Other Actions for Timesheet
Let us have a look at the different actions available for timesheets.
Edit Time Entry
To change the details of a time entry that you’ve created in Zoho Books, you’ll have to edit it. Here’s how you can do it:Go to Time Tracking > Timesheet.Click the Gear icon on the right corner of the entry.Click Edit.Make the necessary changes and click Save.
Clone Time Entry
If you want to create a time entry which has details similar to an existing time entry, you can clone the existing time entry. Here’s how you can do it:Go to Time Tracking > Timesheet. Click the Gear icon in the right corner of the entry.Click Clone.Go through the time entry details and click Save.
Comments & History
You can add comments to your time entry and collaborate with your users. However, these comments are only for internal use and the vendor cannot view them. Here’s how:Go to Time Tracking > Timesheet.Click the Gear icon in the right corner of the entry.Click Comments and History.
Enter the comment.Click Add Comment.
Delete Time Entry
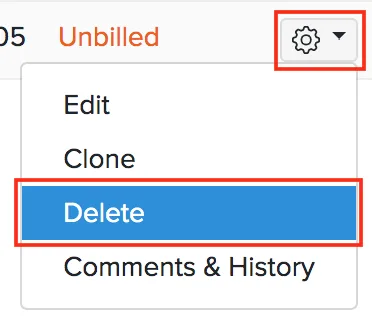
You can delete a time entry if you do not want it anymore. Here’s how:
- Go to Time Tracking > Timesheet.
- Click the Gear icon in the right corner of the entry.
- Click Delete.
- Click OK to confirm.
Export Timesheet
You can export the timesheet in Zoho Books in the CSV or XLS format. Here’s how:Go to Time Tracking > Timesheet.Click the Gear icon in the top right corner of the page.Select Export Projects.Enter the necessary fields.FieldsDescriptionSelect ModuleBy default, the Timesheet module will be selected.Fields in Export FileIf you want to export only certain fields, you can select a template under Fields in Export File. If you don’t have an export template, you can create a new one by clicking + Add New.Export AsSelect the format of your export.Personally Identifyable Information (PII)If you have any PII that you are exporting, mark the box Include Sensitive Personally Identifiable Information (PII) while exporting.PasswordEnter a password to secure your export.
Click Export.
Chrome Extension
Zoho Books offers a timer as an extension for Google Chrome so you can log time even without opening your Zoho Books app. It logs time for your projects in the timesheet module of Zoho Books.
Install the Chrome Extension
To install the chrome extension:Click here or go to the Chrome Web Store and search for Zoho Books Timer.Click the Add to Chrome button.Click Add Extension in the following pop-up.
The extension will now be installed in your Chrome browser. It lets you start the tiomer, log time 🔗manually and view 🔗time entries.
Start Timer
To start the timer from your chrome browser:Click the Zoho Books Timer chrome extension.Select a Project Name and the Task Name. Mark if the entry is Billable.Enter the relevant notes, if any.Click Start.
Once you’ve completed the task, click Stop to stop the timer.
Log Time Manually
If you wish to manually enter the time spent on a project, you can do so under the Log Time tab.
Enter the Date, Project Name, Task Name and Time spent on the project.Fill up the Notes field with additional information if necessary.Click Save.
View Timesheet
You can view the time entries made in your Zoho Books account under the Timesheet tab. This will include both manual entries as well as those made through the timer.
Organization
If you have multiple organizations and wish to log time for projects in another organization, you can:Click the Gear icon in the top right corner of the extension pop-up.Select Organizations and select the required organization.
The projects associated with the said organizations will appear.
Multiple Choice Question
Billable hours are tracked under
What billing method should you choose for a project where you bill clients based on the time you spend working on it?
What action should you take after logging your time sheet entries?
Summary Table: Time-Based Invoicing Process
| Step | Description |
|---|---|
| 1. Enable Time Tracking | Activate time tracking in Zoho Books settings. |
| 2. Create Projects and Tasks | Create projects for client engagements and tasks for individual activities. |
| 3. Log Time Sheet Entries | Enter the date, hours, minutes, and description for each task. |
| 4. Manage/Approve Time Sheets | Review, edit, and approve time sheet entries. |
| 5. Post to Invoices | Create an invoice and import approved time sheet entries to bill the client. |
| 6. Generate Time Tracking Reports | Use timesheet reports to analyze time utilization and profitability. |