Branches
Let’s take a look at how you can set up your branches in Zoho Books.
Enable Branches
To get started with Branches in Zoho Books, you will have to enable it first. To do so:Go to Settings on the top right corner of the page.Select Branches under Organisation.Click Enable Branches to enable the feature.
Note: Only the admins of the organisation can enable this feature in Zoho Books.
You will receive an in-app notification when the Branches feature has been enabled. The current organisation will be considered as the Head Office or Primary Branch.
Warning: Once you enable Branches, you will not be able to disable it in Zoho Books. However, you can delete the branch or mark it inactive.
Create Branch
Once you’ve enabled the feature, here’s how you can create a new branch:Go to Settings on the top right corner of the page.Select Branches under Organisation.Click the Add Branch button in the top-right corner of the page and a new page opens.
Enter the Branch Name and Address.Select a Primary Contact for the branch.Choose the GSTIN you want to associate with this branch. You can also create a new one by clicking + New GSTIN. Learn more about adding Multiple GSTINs.Select the Transaction Series to track the transactions created for a specific branch. If you haven’t created any, click + New Transaction Series from the dropdown.
Click Save.Note: You can choose to associate one GSTIN to multiple branches or add new GSTINs and associate them with each branch.
Configure Transaction Series
Some organisations might want to set a different transaction series for each branch. Let’s say, you want the invoice numbers to be BR1 INV – 001 for a branch and BR2 INV – 001 for another, you can configure them.Note: If you have more than one GSTIN, it is important that the transaction series is unique for each GSTIN.
To create a new transaction series:Go to Settings on the top right corner of the page.Select Branches under Organisation.Navigate to the Transaction Series Preferences tab.Click the + New Transaction Series button and a pop-up opens.
Provide a Name for the series. You can even provide the branch’s name.Select the branch with which you would like to associate this series.Enter the Suffix and Prefix for all the modules.
Click Save.You can also configure the default series and associate them with multiple branches as well.Note: The transaction series will be selected automatically based on the branch chosen in the transaction.
User Permissions
Only the Admin of an organisation has the permission to enable branches in Zoho Books. Also, only they can create branches and access them as well. If you would like to extend these permissions to other users in your organisation, here’s what you’ll have to do:Go to Settings on the top right corner of the page.Select Roles under Users & Roles.Scroll down and you will be able to find Branches.Mark the checkboxes near the permissions you want to provide.
Click Save.
Track Branch Transactions
Once you’ve created branches, included new GSTINs and associated the transaction series, you can start creating transaction. Let’s take a look at how you can include transactions to each branch and track them in Zoho Books:
Associate Branches to Transactions
Each time you create a new transaction, you will be able to associate the branch with your transactions. You will be able to associate them with all your sales, purchase transactions, manual journals, bank transactions, and e-Way bills. To associate:
- Go to any transaction module such under Sales, Purchases, e-Way bills or Journals. For example, let’s associate branches to Invoices.
- Click + New in the top-right corner to create an invoice.
- Select the Customer and the Place of Supply.
- Select the Branch for which you’re creating the transaction.
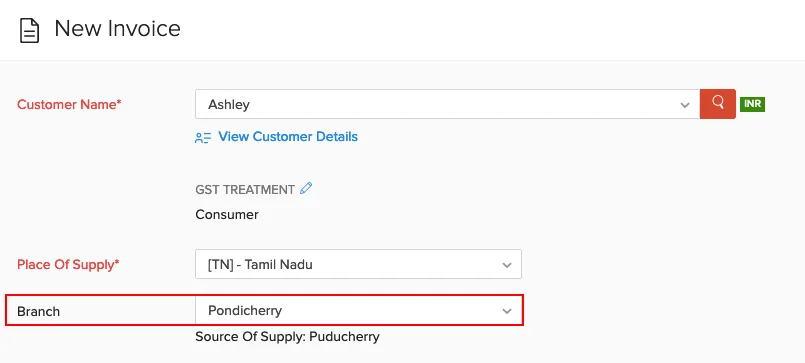
- Based on the branch chosen, the relevant GSTIN and address will be updated in the transaction.
- Enter other details and click Save.
Similarly, you will be able to create transactions and associate branches for other modules as well.
Here are some points to note:
- All the transactions added before enabling the branches feature will be associated to the head office/primary branch.
- By default, all the transactions you create will be tracked under the head office/primary branch. You will have to manually select the branch each time you create a transaction.
- The inter and intra-state taxes will be calculated for each transaction based on the branch chosen.
- The transaction series and address will be chosen according to the branch selected while creating the transaction.
- Payments can be made or collected among the various branches.
- The quote created for a branch cannot be converted to an invoice for another branch. This applies to other transaction types as well.
View Dashboard
When you associate branches with transactions, you can get an overview of each branch’s performance right from the dashboard. Here’s how:
- Go to your Zoho Books’ Dashboard.
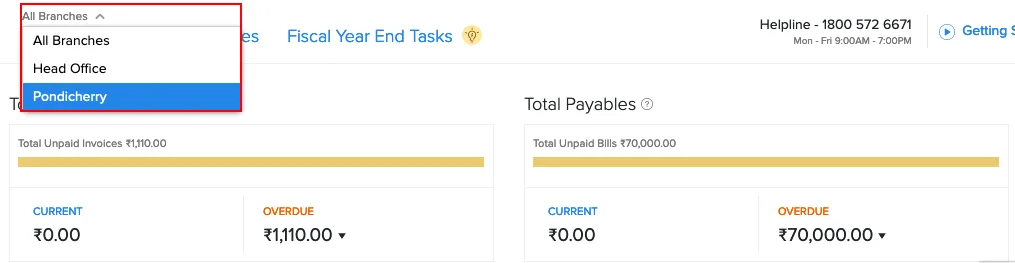
- Click the All Branches dropdown in the top-left corner.
- Select the branch whose details you need to view.
Generate Reports
If you’ve associated transactions with branches, you will be able to generate reports for a particular branch or for all the branches collectively. This lets you view the profits, sales or the expenses of a particular branch.
- Reports for Specific Branches
- View Branch Details in Reports
- Generate GST Returns
Run Reports for Specific Branches:
- Go to the Reports module in Zoho Books.
- Select a report for which you want to view the details. For example, the Profit and Loss report.
- Click the Customise Report option in the top.
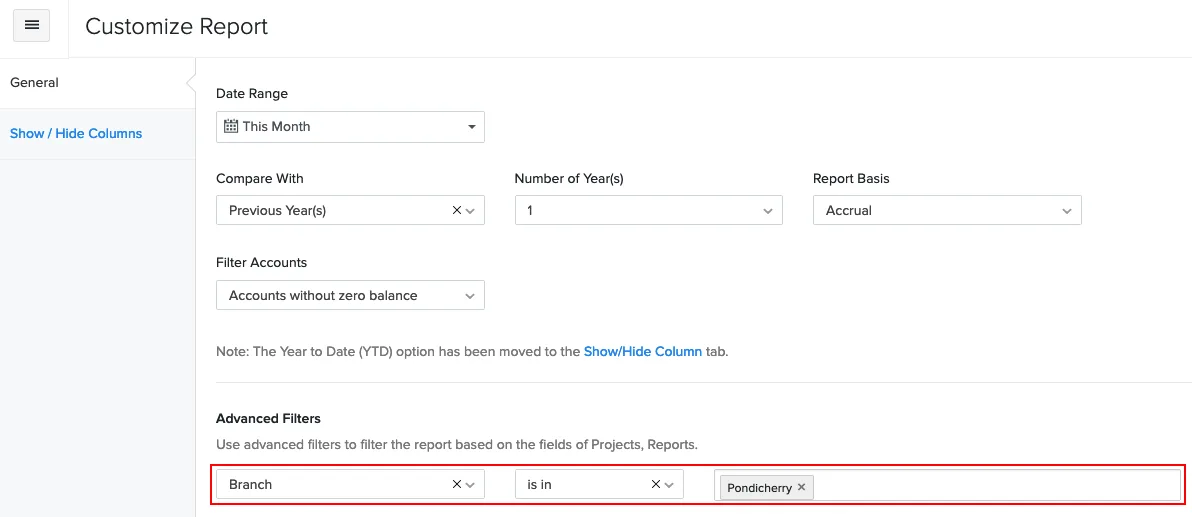
- Go to the General tab and you will be able to find the Advanced Filters option.
- Select the parameter as Branch from the dropdown.
- Set the comparators and choose the branch or branches.
- Click Run Report.
View Branch Details in Reports:
- Go to the Reports module in Zoho Books.
- Select a report for which you want to view the details in the report.
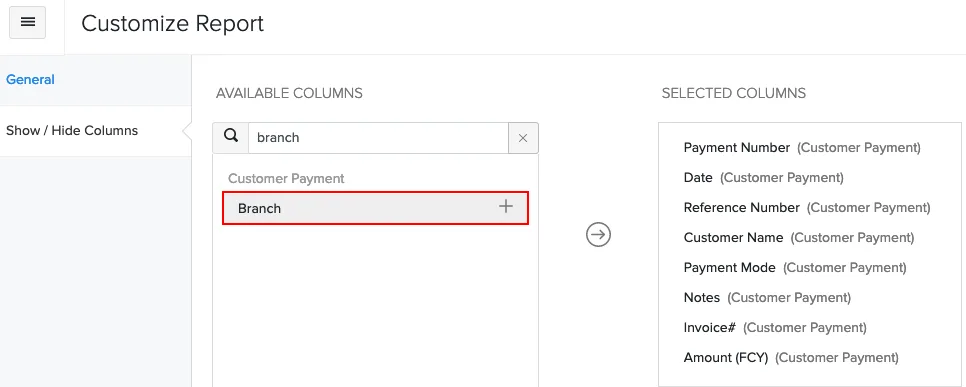
- Click the Customise Report option and go to the Show or Hide Columns tab.
- Select the Branches column and click Run Report.
Generate GST Returns:
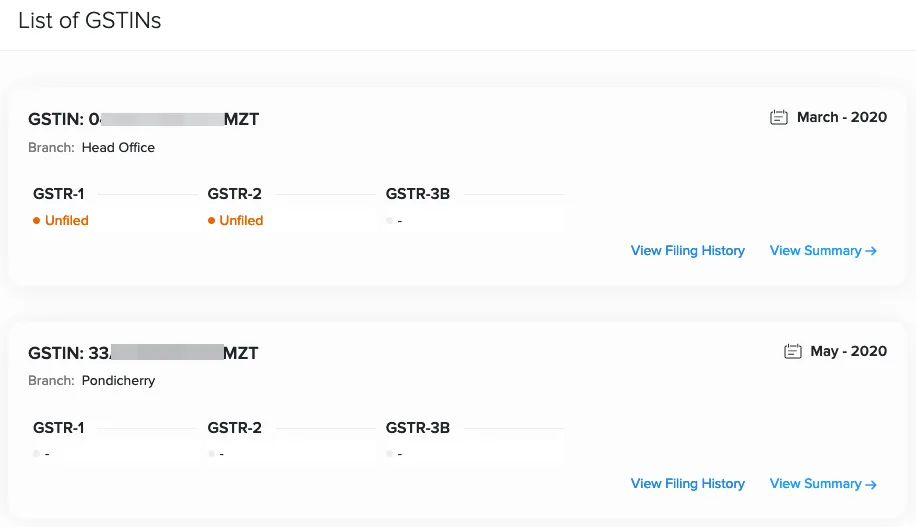
When you have multiple GSTINs, the returns will be generated for each GSTIN separately. A GSTIN dashboard will list all the GSTINs.
In case of GST returns and summaries, a new GST panel with the Branch and GSTIN will be displayed. Click View Summary to view all the returns associated with the GSTIN.
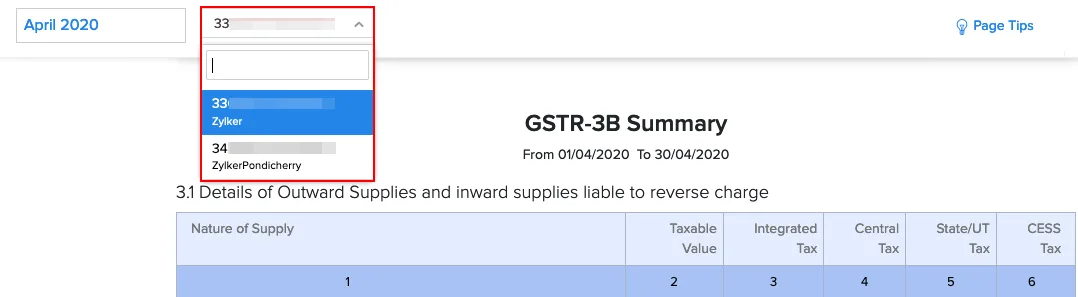
Alternatively, you can also filter the individual tax summaries available in the Reports module.
- Go to the Reports module.
- Select the GSTR-3B Summary (or any return) under Taxes.
- Choose the GSTIN from the drop-down to run the report.
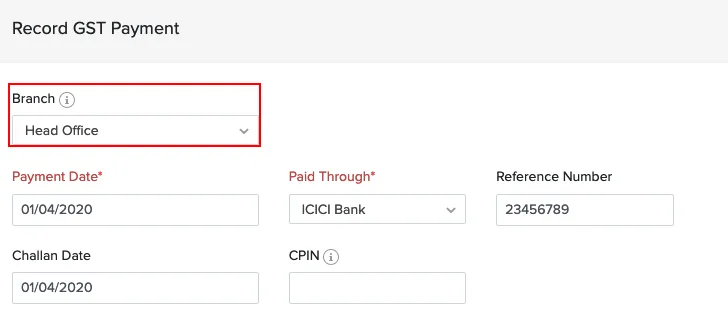
The GST payments you record/make and the returns you mark as filed will also contain your branch details.
Other Actions for Branches
Apart from just creating and deleting transactions, here are some actions that might be useful to manage them:
Advanced Search
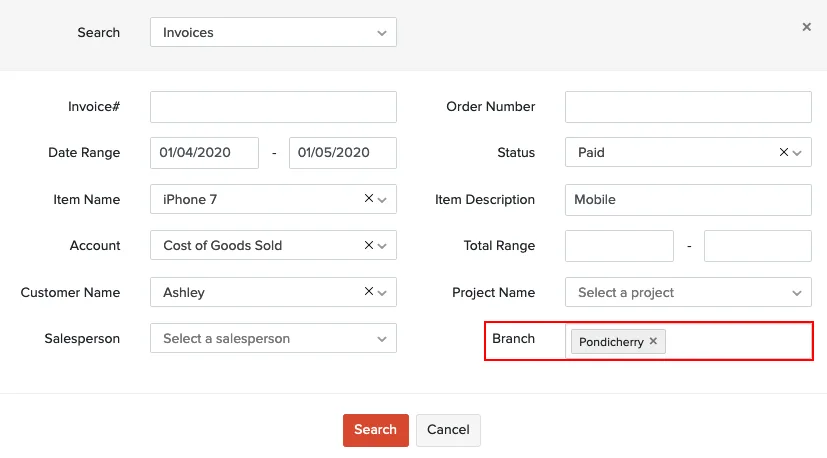
The Advanced Search option in all transaction list pages lets you narrow down your search instead of going through the entire list of invoices. You can now use the branch as a filter option to get your details. Here’s how:
- Click the Search icon available at the top of the page.
- Select the module (let’s say, Invoices) and click Advanced Search.
- Select the Branch and provide other details if available.
- Click Search.
Bulk Update Branches in Transactions
If you’ve recorded the branch for transactions incorrectly, you can select multiple transactions and update the branch at once. To do this:
- Go to the module for which you would like to update the transactions. Let’s say Invoices.
- Select the transactions which you want to update.
- Click the Bulk Update option in the top.

- Select Branch as the field to be updated and choose the branch name with which you want to update.
- Enter a reason for updating the transactions.
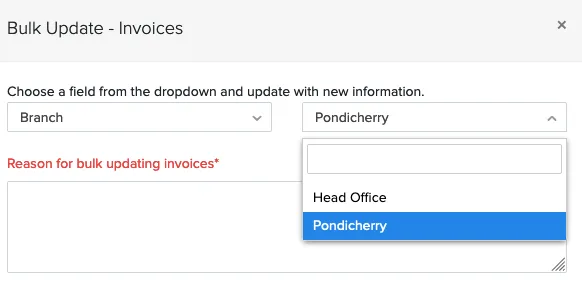
- Click Update.
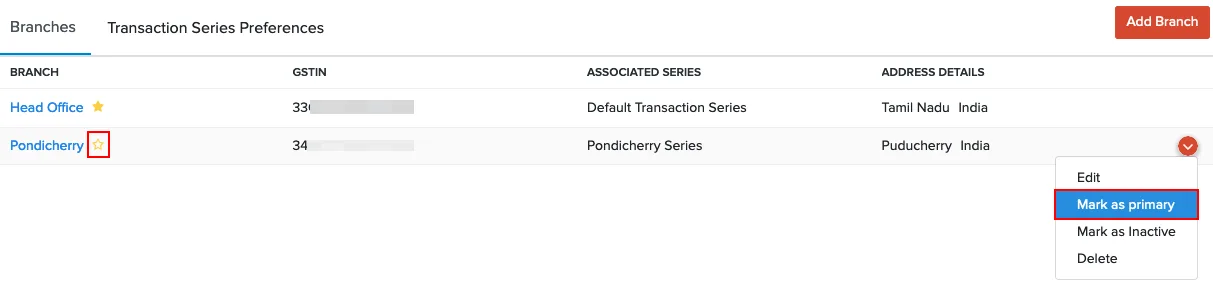
Mark Branch as Primary
By default, the organisation’s initial details will be captured under the Head Office and will be marked as primary. You can however, create a branch and mark that as primary as well. To do so:
- Go to Settings on the top right corner of the page.
- Select Branches under Organisation.
- Hover on a branch and from the drop-down, click Mark as Primary.(or)
- Click the Star icon to mark a branch as primary.
Edit Branch
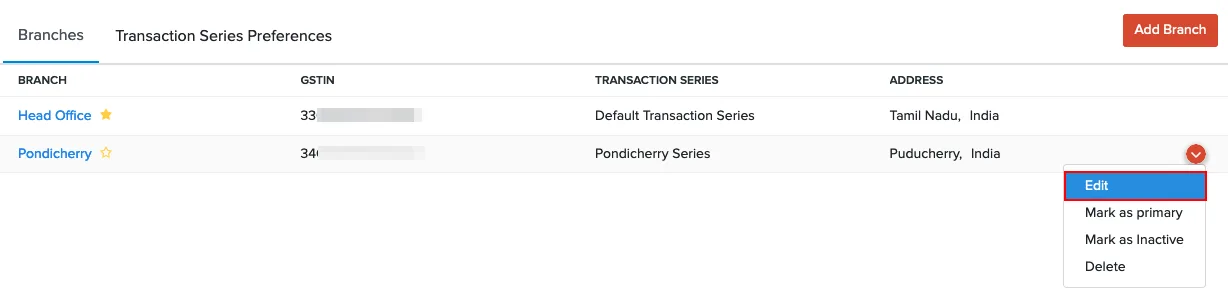
If you would like to change any details of your branch, you can. To do so:
- Go to Settings on the top right corner of the page.
- Select Branches under Organisation.
- Select a branch or hover and click the Edit button from the drop-down.
- Make the necessary changes and click Save.
Delete/Mark Branch as Inactive
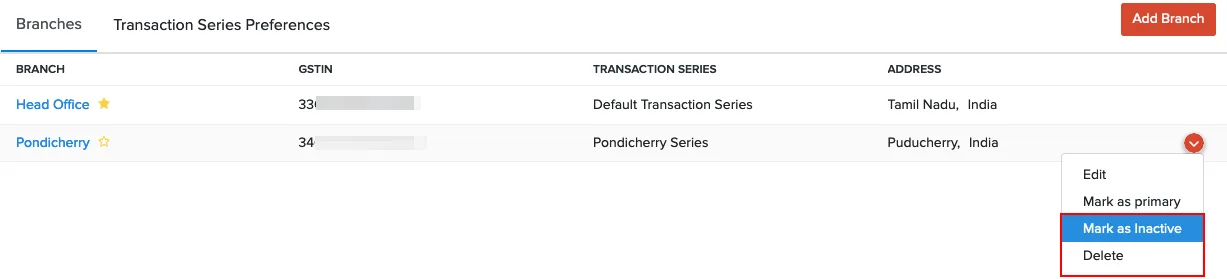
If you’ve closed your branch temporarily, you can mark the branch as inactive so you do not make any transactions through them. However, if you have permanently closed down a branch, you can go ahead and delete it. Here’s how you can do these:
- Go to Settings on the top right corner of the page.
- Select Branches under Organisation.
- Hover on a branch and from the drop-down, click Mark as Inactive/Delete.
Summary Table: Approaches for Simulating Branch Accounting
| Approach | Description | Pros | Cons | Best Use Case |
|---|---|---|---|---|
| Using Departments | Categorize transactions by business unit. | Simple, easy to implement. | Limited reporting capabilities, cannot track assets/liabilities at branch level. | Small businesses with basic branch accounting needs. |
| Using Custom Fields | Tag transactions with branch information using custom fields. | More flexible reporting than departments. | Manual data entry, limited reporting compared to dedicated software. | Businesses that need to track additional branch-specific data. |
| Using Multiple Organizations | Create a separate Zoho Books organization for each branch. | Greatest degree of separation and control, best for complex branch operations. | More setup/maintenance, can be more expensive, consolidating data can be complex. | Businesses with complex branch accounting needs and separate legal entities. |