Step 8: Process Attendance or Production Vouchers:
Use the attendance voucher to record employee attendance, overtime, leave, or production details. You can enter a separate voucher for each day or a single voucher for a pay period (such as a month) with aggregated values. One voucher can store data on all employees and multiple attendance types.
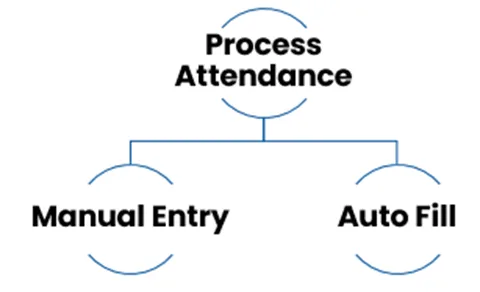
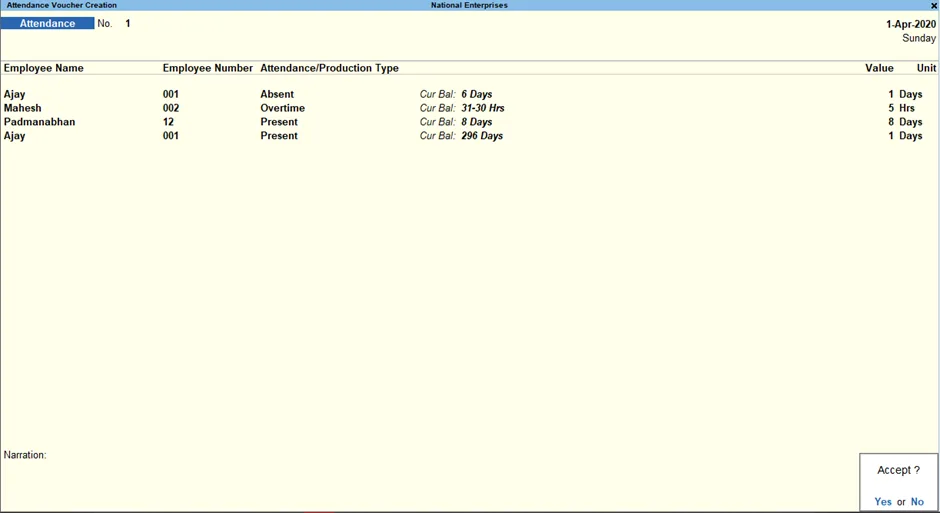
A. Attendance Voucher – Manual Entry
1. Go to
Gateway of Tally
>
Payroll Vouchers
>
Ctrl+F5: Attendance
.
Alternatively, press Alt+G (Go To) > Create Voucher > press F5 > type or select Attendance.
2. Press F2: Date to change the date, if needed.
3. Select the employee whose attendance you want to record from the List of Employees.
4. Select the Attendance/Production Type from the list.
5. Enter the Value.
6. Select End of List from the List of Employees.
7. Accept the screen. As always, you can press Ctrl+A to save
B. Attendance Voucher – Auto Fill
Use the Auto Fill button (Ctrl+F) in the attendance voucher to quickly enter data.
Auto Fill lets you enter attendance data for all employees in a selected employee category or group, for a selected attendance type.
1. Go to Gateway of Tally > Payroll Vouchers > Ctrl+F5: Attendance.
Alternatively, press Alt+G (Go To) > Create Voucher > press F5 > type or select Attendance.
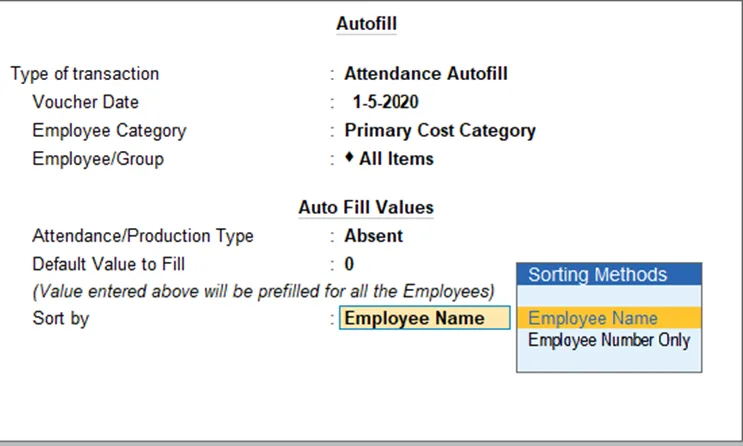
2. Click the A: Attd Auto Fill button.
3. Enter the Voucher Date, if needed.
4. Select the appropriate Employee Category and Employee/Group.
5. Select the Attendance/Production Type.
6. Enter the
Default Value to Fill
for the selected attendance type. This value will be automatically filled for all employees in the group.
Enter the required number of days in the Default Value to Fill field (for example, 0 days for absent and 26 days for present).
7. Select the Sort by field to choose how the employees should be sorted in the voucher.
8. Click OK to close the Auto Fill window.
9. Enter the Value for each employee in the voucher.
10. Press Enter to save the voucher.
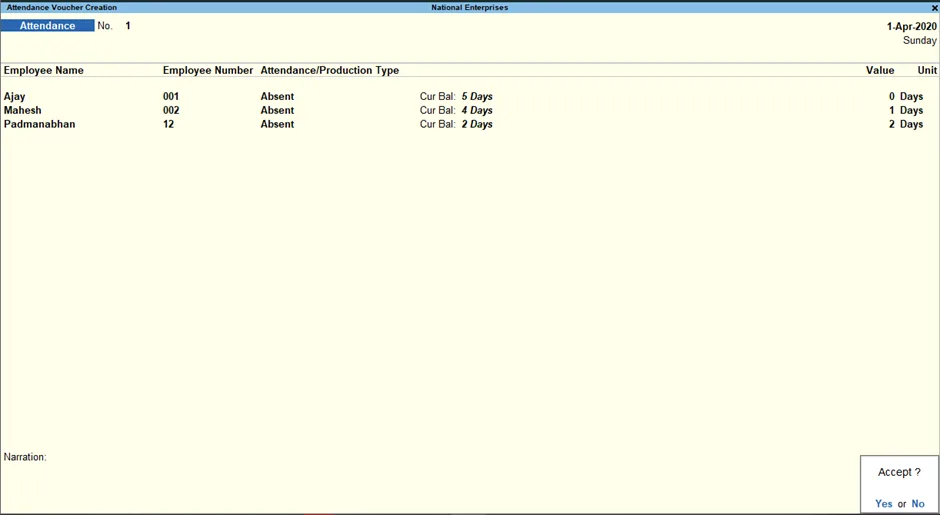
The Auto Fill feature can be a great way to save time when entering attendance for multiple employees. It can also help to reduce errors.
Here are some additional tips for using the Auto Fill feature:
- You can enter multiple attendance types in a single voucher using Auto Fill. To do this, select all the attendance types you want to enter in the Attendance/Production Type field in the Auto Fill window.
- You can also use Auto Fill to enter attendance for employees in different employee categories. To do this, select all the employee categories you want to enter in the Employee Category field in the Auto Fill window.
- You can edit the voucher to make changes to the attendance data after using Auto Fill.
Similarly, you can also use Attendance Auto Fill to record paid leave, overtime, or production details.
Step 9: Processing Salary:
TallyPrime lets you process employee salaries using payroll vouchers and the appropriate payroll ledger. The salary is calculated based on the employee’s defined salary.
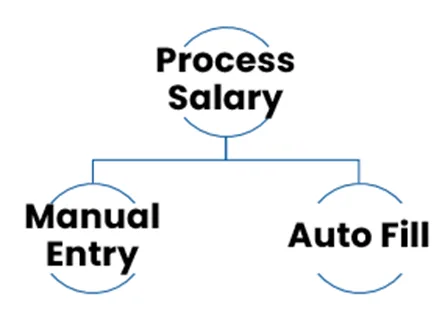
A. Processing Salary (Manual) – Not Recommended
1. Gateway of Tally > Vouchers > press Ctrl+F4 (Payroll). Alternatively, Alt+G (Go To) >Create Voucher > press Ctrl+F4 (Payroll).
2. Press F2 to change the Voucher Date, if needed.
3. Enter the Employee/Group for which you want to process salary.
4. Select the appropriate
Payroll Ledger
from the List of
Ledger Accounts
.
Note: If the salary payment is done through cash, you can select Cash as Payroll Ledger.
4. If necessary, enter the User defined Pay Head values, such as Basic, HRA, Variable Pay or Salary Advance Deductions, etc.
5. Enter the Narration, if any.
6. Accept the screen. As always, you can press Ctrl+A to save.
TallyPrime will calculate the salary based on the employee’s salary structure and any applicable deductions. You can then review the salary details and make any necessary changes. Once you are satisfied with the salary amount, you can post the voucher.
Here is an example of how to manually process salary in TallyPrime:
Suppose you want to process salary for the month of January for the employee John Smith. John Smith’s salary structure is as follows:
Basic Salary: ₹10,000; HRA: ₹2,000; DA: ₹1,000; PF: ₹600; ESI: ₹200
To process salary for John Smith, you would follow these steps:
1. Go to Gateway of Tally > Payroll Vouchers > Ctrl+F4: Payroll.
2. Press F2 to change the Voucher Date to 31-Jan-2023.
3. Enter John Smith in the Employee/Group field.
4. Select the Payroll Ledger for your company.
5. Enter the following User Defined Pay Head Values:
Basic Salary: ₹10,000; HRA: ₹2,000; DA: ₹1,000.
6. Enter the following Narration: Salary for the month of January 2023
7. Press Enter to save the voucher.
TallyPrime will calculate the salary for John Smith as follows:
Total Pay: ₹14,600
Deductions: ₹800
Net Salary: ₹13,800
You can now review the salary details and make any necessary changes. Once you are satisfied with the salary amount, you can post the voucher.
B. Processing Salary (Auto fill) – Recommended
i. Process Salary (Gross and Deductions):
Processing salary using the Auto Fill feature in TallyPrime is a convenient and efficient way to manage employee payrolls. It allows you to process salaries for multiple employees simultaneously, saving you time and effort.
Processing salary (gross and deductions) in TallyPrime involves two main steps:
1. Creating payable ledgers and
2. Processing payroll vouchers.
1. Creating Payable Ledgers
Step-by-step guide on how to create payable ledgers such as Salary Payable, PF Employer Contribution, ESI Employer Contribution, etc. in TallyPrime:
Step 1: Access Create Master
1. Launch TallyPrime and navigate to Gateway of Tally.
2. Select Create Master, followed by Pay Head.
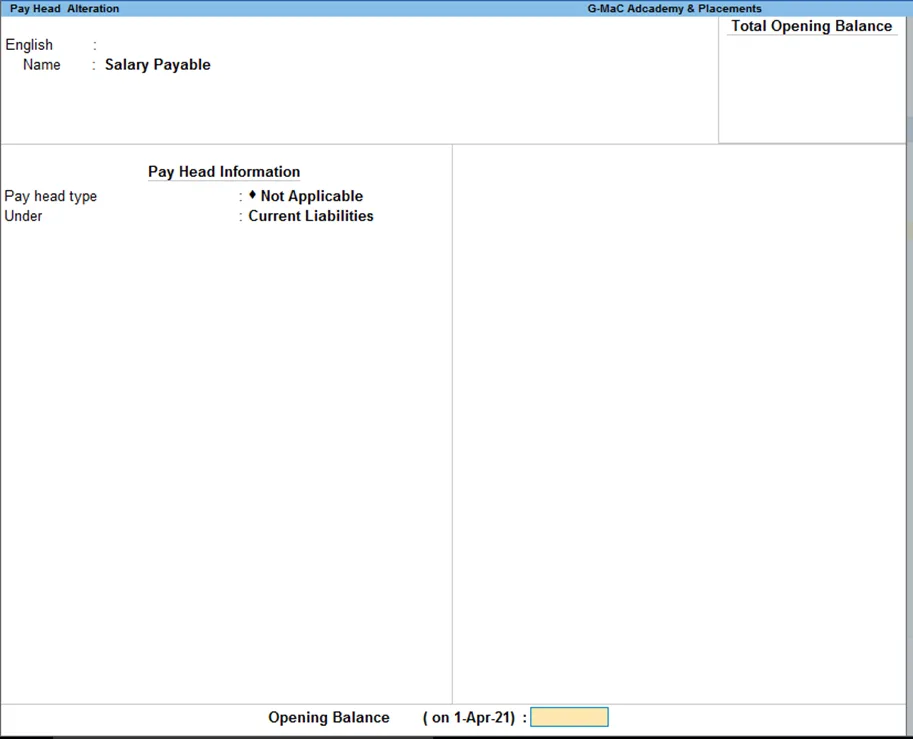
Step 2: Create Pay Head for Salary Payable
1. In the Create Pay Head screen, enter Salary Payable in the Name field.
2.
Select Current Liabilities from the Under field.
3. Choose Not Applicable as the Pay Head Type.
4. Click Create to save the pay head for Salary Payable.
Step 3: Create Pay Head for PF Employer Contribution
1. Click the New button to create another pay head.
2. Enter PF Employer Contribution in the Name field.
3. Select Indirect Expenses from the Under field.
4. Choose Employers Statutory Contributions as the Pay Head Type.
5. Select PF Account from the Statutory Pay Type field.
6. Click Create to save the pay head for PF Employer Contribution.
Step 4: Create Pay Head for ESI Employer Contribution
1. Click the New button to create another pay head.
2. Enter ESI Employer Contribution in the Name field.
3. Select Indirect Expenses from the Under field.
4. Choose Employers Statutory Contributions as the Pay Head Type.
5. Select Employee State Insurance from the Statutory Pay Type field.
6. Click Create to save the pay head for ESI Employer Contribution.
Step 5: Repeat for Other Payable Ledgers
1. Follow the same steps to create pay heads for other payable ledgers, such as TDS, Professional Tax, and any other statutory or non-statutory deductions.
Once you have created all the necessary payable ledgers, you can use them in your payroll transactions to record salary payments, deductions, and employer contributions.
2. Processing Payroll Vouchers
- Access Payroll Vouchers: Launch TallyPrime and navigate to Gateway of Tally, then select Payroll Vouchers.
- Choose Payroll Auto Fill (Optional): For processing salary for multiple employees simultaneously, use the Auto Fill feature:
a. Select
Ctrl+F5: Payroll Auto Fill.
b. Specify the voucher date, employee category, employee/group, payroll ledger, user-defined pay head values, and narration (optional).
c. Review and save the voucher.
- Create Manual Payroll Vouchers (Optional): For processing salary for individual employees or making adjustments, use manual vouchers:
a. Select Ctrl+F4: Payroll.
b. Enter the voucher date, employee/group, payroll ledger, user-defined pay head values, and narration (optional).
c. Save the voucher.
- Calculating Gross Salary and Deductions: TallyPrime automatically calculates the gross salary, deductions, and net salary based on the employee’s salary structure and applicable deductions.
- Recording Payroll Transactions: The payroll vouchers record the salary payments, deductions, and employer contributions to the respective payable ledgers.
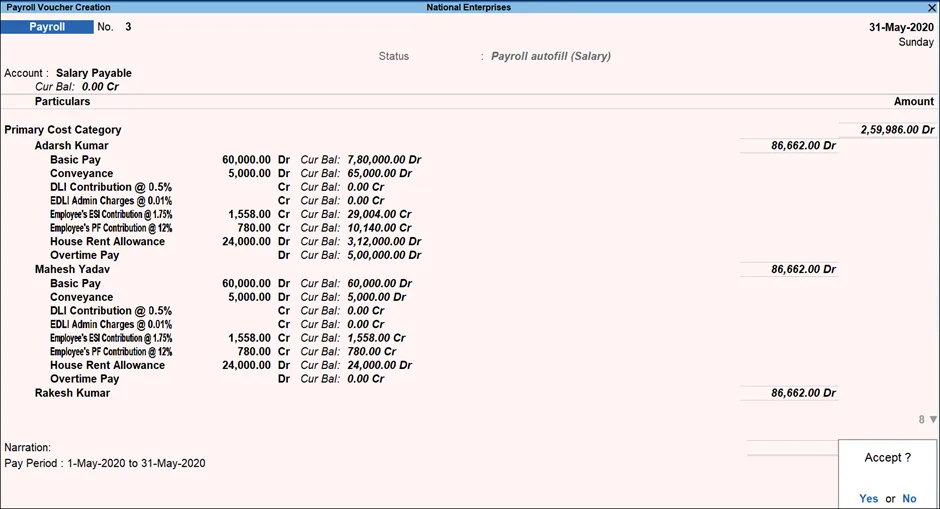
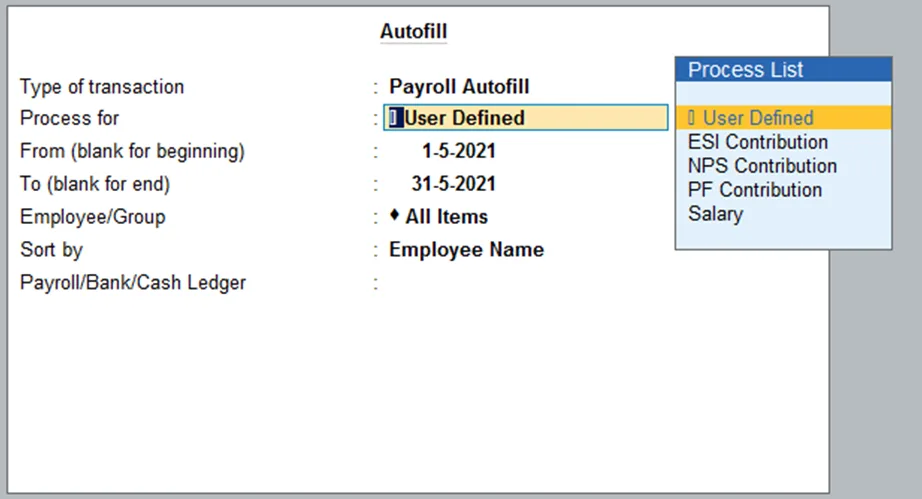
- Process User Defined Values: TallyPrime’s User Defined Values (UDVs) let you create extra fields to store more information about different things in your accounting system. These UDVs can be linked to masters, transactions, and vouchers, allowing you to capture and organize relevant data that might not fit in the standard TallyPrime fields.
a. Gateway of Tally > Vouchers > press Ctrl+F4 (Payroll).
Alternatively, Alt+G (Go To) >Create Voucher > press Ctrl+F4 (Payroll).
b. Press F2 to change the voucher date.
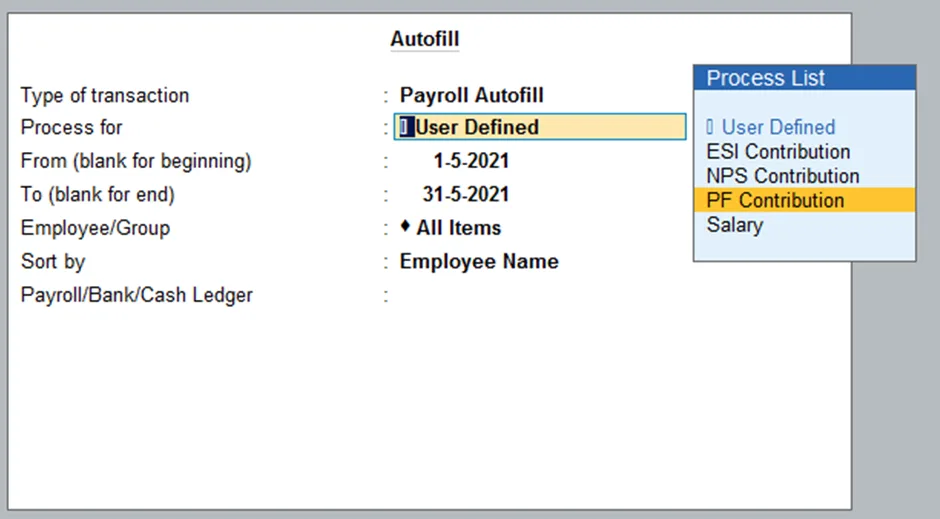
c. Press Ctrl+F to select the Payroll Autofill in the Autofill screen.
d. Type of transaction: select the Type of Autofill as Payroll Autofill.
e. Process for: select the User Defined in the Process for field.
f. From (blank for beginning): enter the From Dates.
g. To (Blank for end): enter the To Dates.
h. Employee/Group: select the Employee/Group from the List of Employees/ Group, whose salary you want to process.
i. Sort by: Select the sorting option in the Sort by field.
j. Payroll/Bank/Cash Ledger: Select the appropriate Payroll Ledger from the List of Ledger Accounts.
To create ledgers, Go to Gateway of Tally > Create > Pay Heads
k. Enter the User Defined Pay Head values. such as Variable Pay or Salary Advance Deductions.
l. Enter the Narration, if any. By default, the payroll voucher shows the pay period in the Narration field.
m. Save the voucher. As always, you can press Ctrl+A to save.
- Process Employer Contribution: There are two main methods for processing employer contributions in TallyPrime:
Method 1: Using Payroll Auto Fill: This method is efficient for processing employer contributions for multiple employees simultaneously.
Steps:
a. Access Payroll Auto Fill: Navigate to Gateway of Tally > Payroll Vouchers > Ctrl+F5: Payroll Auto Fill.
b. Select Voucher Date: Enter or modify the voucher date if needed.
c. Specify Employee Category and Group: Choose the appropriate employee category and employee/group for which you want to process employer contributions.
d. Select Payroll Ledger: Select the appropriate payroll ledger to which the employer contributions will be recorded.
e. Enter User-Defined Pay Head Values (Optional): If necessary, enter any user-defined pay head values, such as variable pay or salary advance deductions.
f. Enter Narration (Optional): Provide a brief description of the voucher if desired.
g. Review and Save Voucher: Review the employer contribution details and save the voucher. TallyPrime will automatically calculate and record the employer contributions.
Method 2: Creating Manual Payroll Vouchers: This method is suitable for processing employer contributions for individual employees or making adjustments.
Steps:
a. Access Payroll Vouchers: Navigate to Gateway of Tally > Payroll Vouchers > Ctrl+F4: Payroll.
b. Set Voucher Date: Enter or modify the voucher date if needed.
c. Enter Employee/Group: Select the employee/group for which you want to process employer contributions.
d. Choose Payroll Ledger: Select the appropriate payroll ledger to which the employer contributions will be recorded.
e. Enter Employer Contribution Pay Head Values: Enter the appropriate values for the employer contribution pay heads, such as PF Employer Contribution and ESI Employer Contribution.
f. Enter Narration (Optional): Provide a brief description of the voucher if desired.
g. Review and Save Voucher: Review the employer contribution details and save the voucher. TallyPrime will automatically calculate and record the employer contributions.